Monday, August 20, 2012

Kindy Father's Day cards

Here's a pic of the Father's Day cards I will be helping my youngest son and all his kindy friends make tomorrow:


I love doing my roster days at the Kindy and spending time with Owen and his teachers.  They do such a wonderful job with our children so I am grateful to be able to help them out by taking the job of Father's Day cards off their to-do list. :-)

I'm using the Dinoroar stamp set and the Happy Father's Day sentiment stamp is from Teeny Tiny Sentiments.  I'm sure the kids will love using the punches and stamps :-)

Tuesday, August 14, 2012

Cards for free

With so many of my card samples no longer "current" (I'd better get cracking on making new ones!) I decided to have a clean out and send a box of hand made cards to work with my hubby.  I figured the guys (and girls) at his workplace might appreciate a free card to give their loved ones.  Every workplace could use a little morale boost I think and freebies always cheer me up!


Monday, August 13, 2012

Retiring List Update

Items sold out so far include:

Stampin’ Scrub Replacement Pads
Peach Parfait ink refill
Dotto refill
Concord Crush ink refill
More Mustard Marker
3/16″ Gold Brads
Pear Pizzazz ink refill
Poppy Parade ink refill
Stack & Store Containers
Circle cutter replacement blades
Christmas Greetings stamp
Confetti White CS A4
Blushing Bride ink refill
Blushing Bride CS
5-petal flower punch
Color Caddy Extender Kit
Stampin’ Around Wheel Storage – Standard size
Timeless Type Junior Alphabet Dies
Concorde Crush CS A4

Tuesday, August 7, 2012

3D flower from Blossom punch

Here's a quick photo tutorial on how to make a 3D flower from the blossom punch.


Monday, August 6, 2012

Back from Scrap Camp!

I've just spend a great weekend at a scrapbooking camp, mind you, I am feeling pretty tired now!  I really need to sleep more when I go to these camps. :-)

I don't have any photos of the layouts I created just yet, I hope to get time to take photos of them tomorrow.  But here's a pic of my bags packed and ready to go on Friday! Packing is the hardest part, deciding what to take with me as there's just not room to take everything ;-)


My strategy is to do a bit of preparation before I go.  I choose the photos I want to scrap and gt them printed. Then I put them into 12x12 packets with some DSPs and card stock that I think will work with each set of photos.  I don't spend too much time working it out - just grab what I think will work with the colours.  Then I pack all the rest - matching card stock, accessories, tools etc that I will need to go with those packets I've put together.  This prevents me feeling like I need to take everything.

The great thing about camps is there is bound to be someone else there who has just the right stamp, piece of card stock, embellishment etc if you have not brought yours.  Its a great caring and sharing environment :-)  I was very pleased to be able to give a few people something from my stash that could help them with their pages on the weekend.

Friday, August 3, 2012

Pretty Pinwheels

Recently I held my annual Hostess Evening and part of the little thank you gifts I gave them was a set of pretty paper pinwheels.  Lots of people commented how much they liked them so I thought I'd share some pictures here with you.


Thursday, August 2, 2012

So much for New Year's Resolutions!

If my blog was a room full of people I would be slinking through the door with my head down! LOL!

I don't think I'll bother apologising, I'll just attempt to get back on the horse :-)

Hopefully you'll see a bit more blogging action and I've even managed to link this to my Stampin' Up! website (www.stampinwithbec.stampinup.net) and the next step will be an attempt to link to Facebook.

If you're on Facebook, please go and like my page there - it has been updated fairly regularly this whole time and you can RSVP for events as well.

Saturday, February 4, 2012

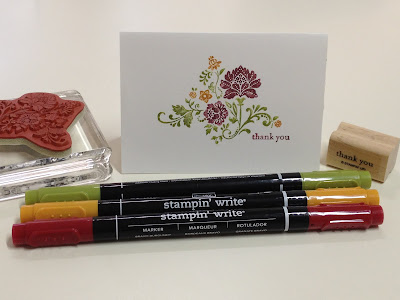
One-layer thank you cards


I like to make thank you cards to put in my hostess and customer orders. Because I need to make quite a lot of these, I like to keep them simple.

What could be more simple than a one-layer card? Certainly saves time if I don't have to cut up lots of layers.


Here's my most recent thank you card:


I've used a beautiful new stamp from the "Fresh Vintage" stamp set - available as a free gift during Sale-a-bration. The colours are Bravo Burgundy, More Mustard and Old Olive. The "thank you" sentiment is from the "Teeny Tiny Sentiments" stamp set.

Markers are a great way to get lots of colours onto a one-layer card.

Friday, February 3, 2012

Simple Masking


Here's a card I made a while ago now. I used it as a make'n'take project as it is fun and easy to make.

I've used the masking technique on this card. I stamped the flowers first, then "masked them" before stamping the leaves. I made my mask out of a "post it note". This makes it easy to remove the mask and use it again.

If you'd like to learn more about masking, you can always book a workshop with me and try it out for yourself :-)

Stamps: Summer Solstice, Perfectly Penned
Inks: Chocolate Chip, Wisteria Wonder, Lucky Limeade
Paper: Whisper White, Chocolate Chip
Accessories: Basic Pearls, Scalloped Dots ribbon (Chocolate Chip)

Thursday, February 2, 2012

Back to blogging


Wow, it has been over a year since I last updated this blog! Life has been pretty busy and blogging just fell by the wayside unfortunately. BUT - I am back :-) I intend to start blogging again, not daily, but hopefully at least twice a week.

It's Sale-a-bration time right now so I thought I would start with the make'n'take project from my last couple of workshops:

I've used the new Designer Series paper which you can receive for FREE during Sale-a-Bration. Simply place a $100 order to choose it as your free gift. There are other free gifts available to choose from too. Check out the brochure HERE.

Stamps: Pretty Postage (available in the Summer Mini catalogue)
Ink: Poppy Parade
Paper: Lucky Limeade, Pool Party, Very Vanilla, Everyday Enchantment DSP
Accessories: Everyday Enchantment Ribbon and Brad Pack (another free gift from Sale-a-Bration)
Tools: Big Shot and Perfect Polkadots embossing folder, 1 inch square punch, postage stamp punch and scallop square punch.


If you would like to learn to make this card, please contact me to book a free workshop. :-)


I also made some little paper samplers so that my friends and customers can see the beautiful Designer Paper in person - it always look so much nicer in real life than the picture in the brochure. I used the Two Tags Die on my big shot as well as the matching brad and ribbon pack. These 2 pictures show the front and back sides of the sampler.