Thursday, June 26, 2008

Colour Challenge attempt number 2

So...I wasn't very happy with my first attempt.  I decided to quickly take it apart and see what else I could do with it.  The kids are asleep so I just had to take advantage of my little bit of free time!

I pulled out the rub-ons which I hadn't even opened yet!  I applied a nice background to the card with that.  Then I mounted another piece of River Rock behind the word windo
w cut-out and applied a rub-on sentiment in there.  I put the flowers and ribbon back on and now I'm MUCH happier with this card.  It really needed that white.

So I go to take a photo and the good camera won't take a picture for me!  I only know how to use it on full auto (hubby is the better photographer) and yes, the lens cap is off - but it still won't take a pic.  I had to pull out the little camera - it will do.

Here is the new, improved card:

Edited to add: Ok, I figured out why the camera wouldn't take a picture - I was too close to the card.  Apparently I needed to be further back and just use the zoom - doh! Oh well, at least I know now...

Wednesday, June 25, 2008

Colour Challenge

This is the first time I have tried a colour challenge.  I really think I could have done a LOT better but I did this one in about 15 minutes after the kids went to bed and the washing up was done etc etc etc...  I would have liked to stay up late to do some more but sleep is precious in our house at the moment!

If you haven't seen her blog already, Kristina Werner is worth checking out.  She regularly posts these colour challenges and this week's is:


And here is my first effort.  I would like to say I'll have another go at it tomorrow but I know I probably won't get any time.  I'll certainly be having a go at next week's though!


I coloured some flowers from my new Pretties Kit.  The large one was coloured with ink from the Purely Pomegranate reinker and Aquapainter and the smaller one was coloured with the Regal Rose marker.  The centre is a rhinestone brad from the Pretties Kit.

The card base is textured River Rock and the ribbon is Wild Wasabi stitched grosgrain.  

I used the Word Window punch in the bottom left corner and stamped the sentiment in Regal Rose ink.

It was only after checking back at Kristina's blog that I realised I had not used all the colours - no Whisper White!  (Unless you count the white stitching in the ribbon I guess) So I don't know if this card even qualifies for the challenge now.  Never mind.  I still had fun making it!

Apologies for the bad lighting - I knew I would most likely not get time to take a photo in the daylight tomorrow so I settled for taking one tonight.  The camera just did not like the overhead lighting in my kitchen.

Tuesday, June 24, 2008

Swirly Box and Mini Cards - new version


So here's my updated version of the box and cards from THIS post.  I have changed the stamps used to reflect stamps I already have at home.  I also tried to keep it to a minimum of stamp sets.  I have used: Priceless, Petals and Paisleys (for the spotty background) and Occasional Greetings.


Old Olive and Very Vanilla cardstock, Vanilla grosgrain ribbon

Chocolate Chip, Old Olive, Pretty in Pink and Whisper White cardstock
Purely Pomegranate textured cardstock and stitched ribbon, Pretty in Pink, Whisper White cardstock
Pretty in Pink cardstock, soft subtles brads

Kraft, Old Olive ad Whisper White cardstock

Sunday, June 22, 2008

So Swirly Wheel Tutorial

Well it's about time I posted another tutorial for you - it's been a while!
This one will show you a few things you may not have seen before. I'm going to show you how to get more than one colour on your Stampin' Around Wheels using markers and I'll also who you the Crop-a-dile.

Here's the card I'm going to show you how to create:

Spray some Stampin' Mist onto a cotton bud and use it to remove the Mellow Moss ink from the flowers on the wheel.  I like to start at the seam of the wheel so I know where I have started and therefore where to finish.  
Now use your Pretty in Pink marker (from the Soft Subtles marker set) to colour in those flowers you have removed the Mellow Moss ink from.
Wheel this onto a piece of Whisper White cardstock slightly smaller than the front of your card.  About 10cm x 14.3cm should give you a 0.25cm border all the way around.

Here's a close up of how it looks with the 2 colours on there.

Using Mellow Moss ink, stamp the flower image from the "Priceless" stamp set onto Whisper White card.

Punch out the image with the 1 and 1/4 inch (32mm) circle punch.
Use the 1 and 3/8 inch circle punch to punch out a layer of Pretty in Pink.
Punch out a scallop from Whisper White.
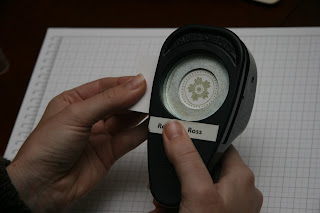
Use SNAIL adhesive to stick all 3 layers together. Normally this would be quite hard to punch a hole through for your eyelet but the Crop-a-dile does it really easily.
Using the smaller hole punch, punch through all 3 layers.  You need very little pressure to do this.  You don't have to have a lot of strength in your hands to use the Crop-a-dile.  It takes very little effort to punch right through layers of cardstock, chipboard, plastic and even tin.
Pop in a Pretty in Pink eyelet.
Set the eyelet using the C3 setting on the Crop-a-dile.  Again, it will set your eyelet so easily with very little pressure.
Stamp the greeting in Mellow Moss ink on a piece of Mellow Moss cardstock about 9.5cm x 4cm.
Using the A1 setting on the Crop-a-dile you can dry emboss some little cirlces randomly all over this piece of cardstock.  Just use a very light touch to do this - you don't need to squeeze hard at all.

Here's how it looks with little circles dry embossed all over.
Adhere your white layer to the card base and then the Mellow Moss layer to the top part of the white piece.  I used SNAIL adhesive for my layers.  Now all you need to do is put a few Dimensional adhesives on the back of your scallop and pop that on the top right hand corner of the card.  And there you go - all done!

I hope you enjoyed this tutorial on using markers on your wheels and using the Crop-a-dile for eyelets and dry embossing.

Sunday, June 8, 2008

Wedding Card

I whipped this card up pretty quickly today while the kids were asleep.  As much as I would have liked to create something more intricate for a wedding card, I am time poor these days! And the wedding is this weekend!


I wheeled the jumbo wheel on whisper white cardstock with Versamark ink and embossed with silver embossing powder (EP). I layered that piece on brushed silver and then again onto the amethyst card base.

I stamped the wedding cakes in versamark and embossed in silver EP, then coloured parts of the image with my amethyst marker.  This was then all layered on brushed silver and amethyst cardstock and adhered to the card with dimensionals.

The sentiment was stamped in versamark, embossed in silver EP and punched out with the small oval punch. It was layered onto a piece of amethyst that was punched with the large oval punch and the whole piece was adhered to the card with dimensionals. 

I stamped the leaf stamp onto the envelope with versamark and embossed with silver EP.

Stamps: Leaves A La Carte (jumbo wheel), Occasional Greetings, Fun and Fast Notes, Carte Postale (on the envelope)
Paper: Almost Amethyst, Whisper White, Brushed Silver, Whisper White envelope
Ink: Versamark, Almost Amethyst ink pad and marker
Accessories: Silver Embossing Powder
Tools: Heat Tool. Embossing Buddy, Small and Large Oval Punches

Thursday, June 5, 2008

Note Cards and Box

At our last Paper Angels meeting on Friday night we made these cute little note cards with a box to keep them in.  These were really fun and easy to make.  Thanks to Liz and Colleen for the lovely designs.


The box is super simple to do and I will be demonstrating it at my workshops this month.  I LOVE the So Swirly Jumbo Wheel we used on the box.  I was so excited when mine arrived.  I have a few other tricks up my sleeve to show you with this wheel this month so stay tuned!


Stamps: Boho Backgrounds, Garden Whimsy, Short and Sweet
 
Inks: Old Olive, Rose Red, Chocolate Chip, Pretty in Pink

Papers: Kraft, Chocolate Chip, Old Olive, Rose Red, Whisper White, Very Vanilla, Pretty in Pink, Petals & Paisleys DS paper

Accessories: Jumbo Eyelets, Rhinestone Brads, Choc Chip wide Grosgrain Ribbon, Double Stitched grosgrain in Purely Pomegranate and Wild Wasabi

Tools: Crop-a-dile, Scallop circle punch, 35mm and 32mm Circle punches, Spiral punch

I am currently working on making some similar ones but with different stamps and accessories since I don't have the exact ones we used at the meeting.  I will post pics of mine when they are done.

Wednesday, June 4, 2008

Newsletters

Hi everyone,

Just a quick post to let you know that you can view my newsletters online via links here on my blog.  This way, if you delete it from your inbox but then need to read it again at a later date, you can find it here.

You will find the links on the left-hand side of the blog.